
Your First Script
This chapter is where everything you've learned so far comes together.
By the end of this guide, you'll have:
- Installed the official Flowstride VS Code extension.
- Created your first Flowstride workspace configuration.
- Written your first
.flowautomation. - Executed it with a single click.
- Watched Flowstride automate a real application.
Although the example is intentionally simple, it demonstrates the same workflow you'll use when building much larger automation suites.
Why the VS Code Extension?
Flowstride scripts can be written in any text editor, but we strongly recommend using the official Visual Studio Code extension.
The extension provides a first-class development experience for writing, reading, and executing Flowstride automation.
Among other things, it includes:
- Rich syntax highlighting
- Native
.flowlanguage support - IntelliSense
- Error diagnostics
- One-click execution directly from the editor
Because the extension understands the Flowstride language, it can immediately highlight syntax issues while you type, making it much easier to learn the DSL.
For the remainder of this guide, we'll use the Flowstride VS Code extension.
Install the Extension
Open the Extensions view inside Visual Studio Code and search for Flowstride.
Install Flowstride Automation published by flowstride.
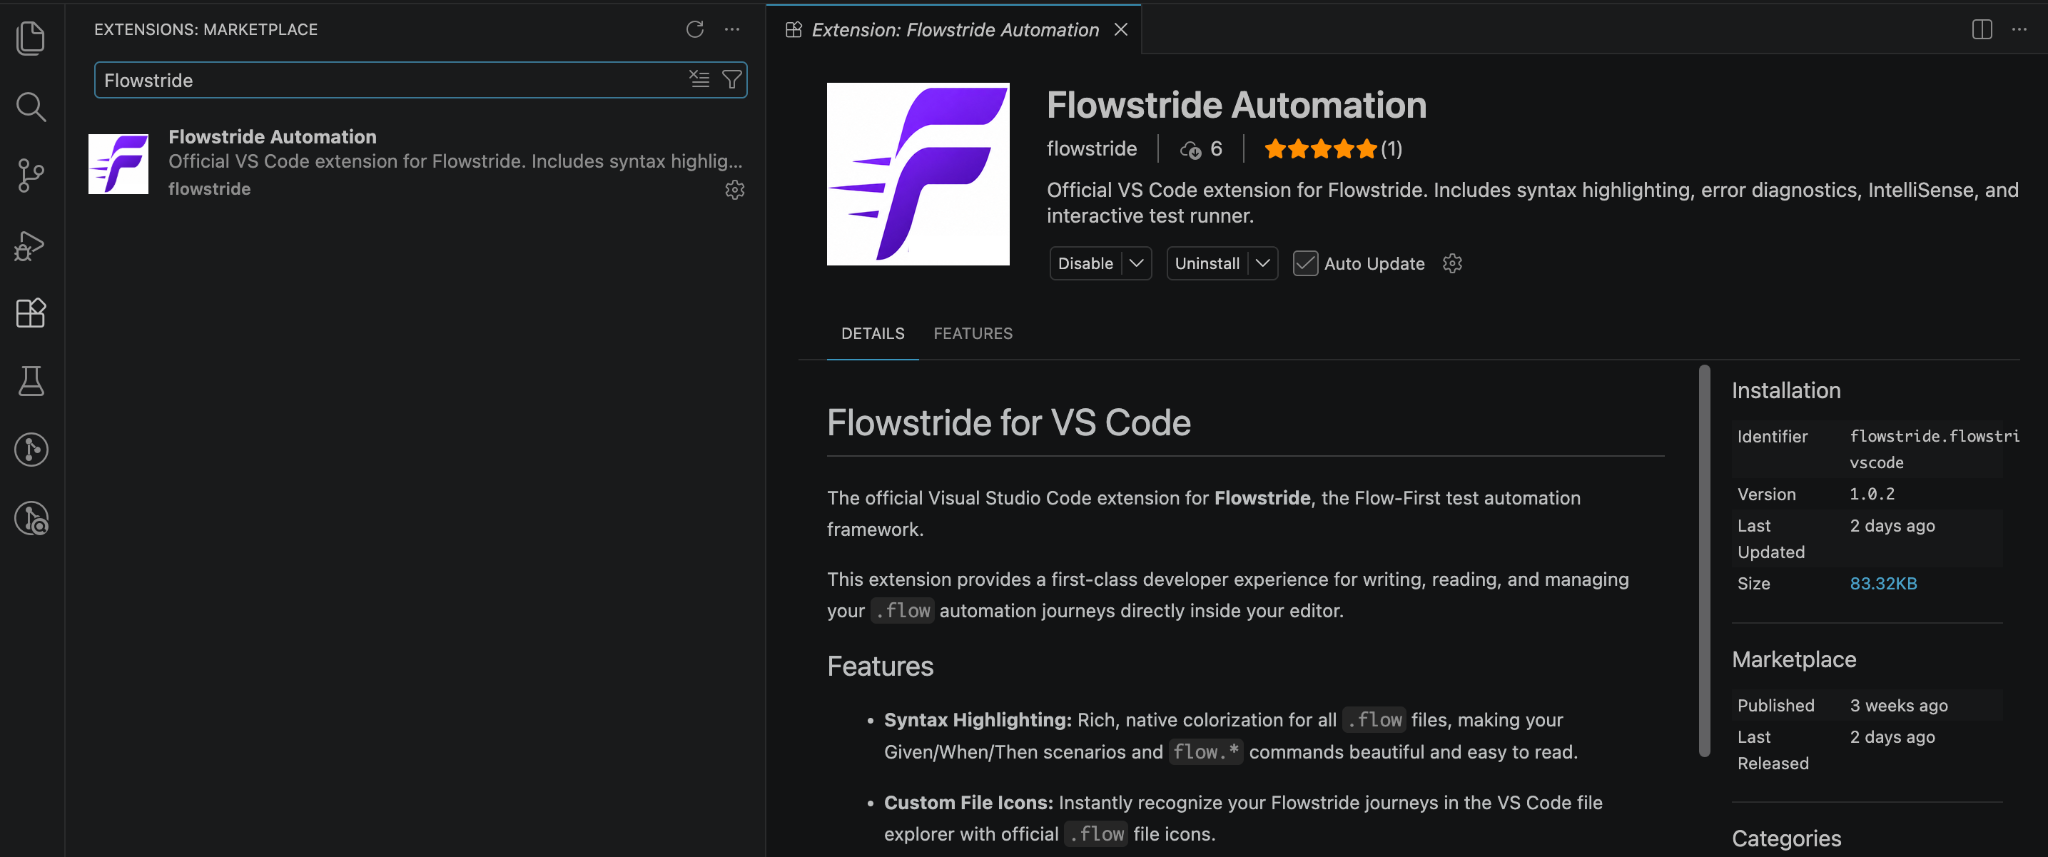
Once installed, Visual Studio Code will automatically recognise .flow files and provide syntax highlighting, language support, IntelliSense, error diagnostics, and integrated test execution.
Create Your Environment File
Before writing your first automation, create a file named:
.envInside it, add your application's base URL.
BASE_URL=https://www.qacar.onlineYour project may eventually contain multiple environment variables.
For example:
BASE_URL=https://www.qacar.online
API_URL=https://api.qacar.online
ADMIN_URL=https://admin.qacar.online
Flowstride treats BASE_URL specially.
When BASE_URL is defined, relative navigation automatically resolves against it.
For example:
flow.open "/";automatically navigates to:
https://www.qacar.online/Other environment variables are not resolved automatically. Instead, they are referenced explicitly using the .env syntax.
For example:
flow.open "{{env.ADMIN_URL}}";

flow.post "{{env.API_URL}}";
This keeps your automation concise for everyday browser navigation while still allowing any environment-specific value to be injected wherever it's needed.
Keeping environment configuration separate from your automation makes your tests easier to maintain as your project grows.
Why BASE_URL Matters
One of the biggest mistakes beginners make is hardcoding URLs throughout their automation.
For example:
flow.open "https://www.qacar.online/"This works.
However, imagine your automation later needs to execute against:
- Development
- QA
- Staging
- Production
Every hardcoded URL would need to be updated.
Instead, Flowstride automatically reads the BASE_URL value from your .env file.
This allows you to write much cleaner automation.
For example:
flow.open "/";During execution, Flowstride automatically combines the relative path with the configured BASE_URL.
In our example, the command above becomes:
https://www.qacar.onlinewithout requiring any changes to the automation itself.
Changing environments is now as simple as updating your environment configuration rather than rewriting your Flowstride scripts.
This keeps your automation portable, reusable, and much easier to maintain.
Learn Good Habits Early
Throughout this documentation, we'll always prefer:
flow.open "/";over
flow.open "https://www.example.com/";Keeping URLs inside your .env file is the recommended approach for every Flowstride project, regardless of its size.
Developing this habit from your very first automation will make future projects significantly easier to maintain.
Create Your First Flow
First open your .env and make sure you have the follwing:
BASE_URL=https://www.qacar.online

EMAIL=user@flowstridemail.com
PASSWORD=Test@12345
With your environment configured, it's time to write your first Flowstride automation.
Inside the flows directory, create a new file named:
login.flowAdd the following Flowstride script.
Feature: User login flow

  Scenario: User logs in successfully

    Given "User lands on home page";
      flow.open "/";

    When "User clicks on Log in, near Sign Up";
      flow.click "Log in" near "Sign up";

    When "User fills the login form";
      flow.type "Email" "{{env.EMAIL}}";
      flow.type "Password" "{{env.PASSWORD}}";

    When "User clicks the Login button";
      flow.click button "Login";

    And "User should be logged in";
      flow.expect visible "Logout";

    Then "User logs out";
      flow.click button "Logout [0]";
Congratulations!
You've just written your first Flowstride automation.
Although the script is small, it demonstrates the same structure you'll use when building much larger automation suites.
Before running it, let's understand what you've written.
Understanding the Script
One of Flowstride's design goals is that automation should read like a description of user behaviour rather than a sequence of browser commands.
Instead of asking:
"Which browser action should I execute next?"
Flowstride encourages you to describe:
"What is the user trying to accomplish?"
That's why every Flowstride script follows the same high-level structure.
Feature
    │
    └── Scenario
            │
            ├── Given
            ├── When
            ├── When
            ├── And
            └── Then
Each part has a specific responsibility.
Feature
Every .flow file begins with a single Feature.
Feature: User login flowA Feature represents a business capability.
Examples include:
- User Authentication
- Customer Registration
- Loan Application
- Product Checkout
- Password Reset
Think of a Feature as the container for everything related to that business capability.
If you've previously used Playwright Test or Cypress, you can think of a Feature as serving a similar organisational purpose to a describe() block.
One important difference is that a Flowstride file may contain only one Feature.
This keeps every automation file focused on a single area of the application.
Scenario
Inside every Feature are one or more Scenarios.
Scenario: User logs in successfullyA Scenario represents one complete user behaviour.
Rather than describing technical steps, its name should describe the outcome being verified.
Good examples include:
- User logs in successfully
- Customer places an order
- User resets their password
- Customer updates their profile
If you're familiar with Playwright or Cypress, a Scenario is comparable to an individual test() or it() block.
Just as a single describe() can contain many tests, a single Flowstride Feature can contain many Scenarios.
For example:
Feature: User Authentication

Scenario: User logs in successfully

Scenario: User enters an invalid password

Scenario: User resets their password

Scenario: User logs out
Grouping related Scenarios inside a single Feature makes your automation easier to organise and easier to understand.
Why This Structure Matters
Flowstride intentionally separates business behaviour from implementation details.
When someone reads your automation, they should immediately understand what is being tested before looking at how it is being tested.
For example:
Scenario: User logs in successfullyalready tells the reader the purpose of the automation.
The Flowstride commands underneath simply describe how that behaviour is achieved.
As projects grow to hundreds or even thousands of Scenarios, this structure makes automation read more like living documentation than browser scripts.
That's one of the core design principles behind the Flowstride DSL.
Think in Business Behaviours
When naming Features and Scenarios, avoid technical descriptions such as:
- Click Login Button
- Fill Email Field
- Open Dashboard
Instead, describe the business outcome being verified.
For example:
- User logs in successfully
- Customer completes checkout
- Loan application is approved
This keeps your automation readable for both technical and non-technical team members.
Understanding the Script
Now that you've written your first Flowstride automation, let's walk through it one section at a time.
One of Flowstride's design goals is to make automation read like a description of user behaviour rather than a sequence of low-level browser commands.
Instead of thinking:
"What browser action should I execute next?"
Flowstride encourages you to think:
"What is the user trying to accomplish?"
That's why every step begins with a natural language description before the automation command itself.
Given
Every Scenario begins with a Given block.
Given "User lands on home page";
  flow.open "/";
A Given establishes the starting point of the Scenario.
It prepares the application for the behaviour that follows.
In this example, Flowstride automatically opens the application's home page using the BASE_URL defined in your .env file.
Because BASE_URL is already configured, the automation only needs to navigate to:
flow.open "/";rather than hardcoding the full URL.
This keeps your automation portable across multiple environments.
When
A When block represents an action performed by the user.
For example:
When "User clicks on Log in, near Sign Up";
  flow.click "Log in" near "Sign up";
Here, the sentence explains the user's intention.
The flow.click command then describes how Flowstride should perform that action.
Instead of relying on fragile CSS selectors, Flowstride can locate elements using relationships that are meaningful to humans.
In this case, Flowstride clicks the Log in button located near the Sign up button.
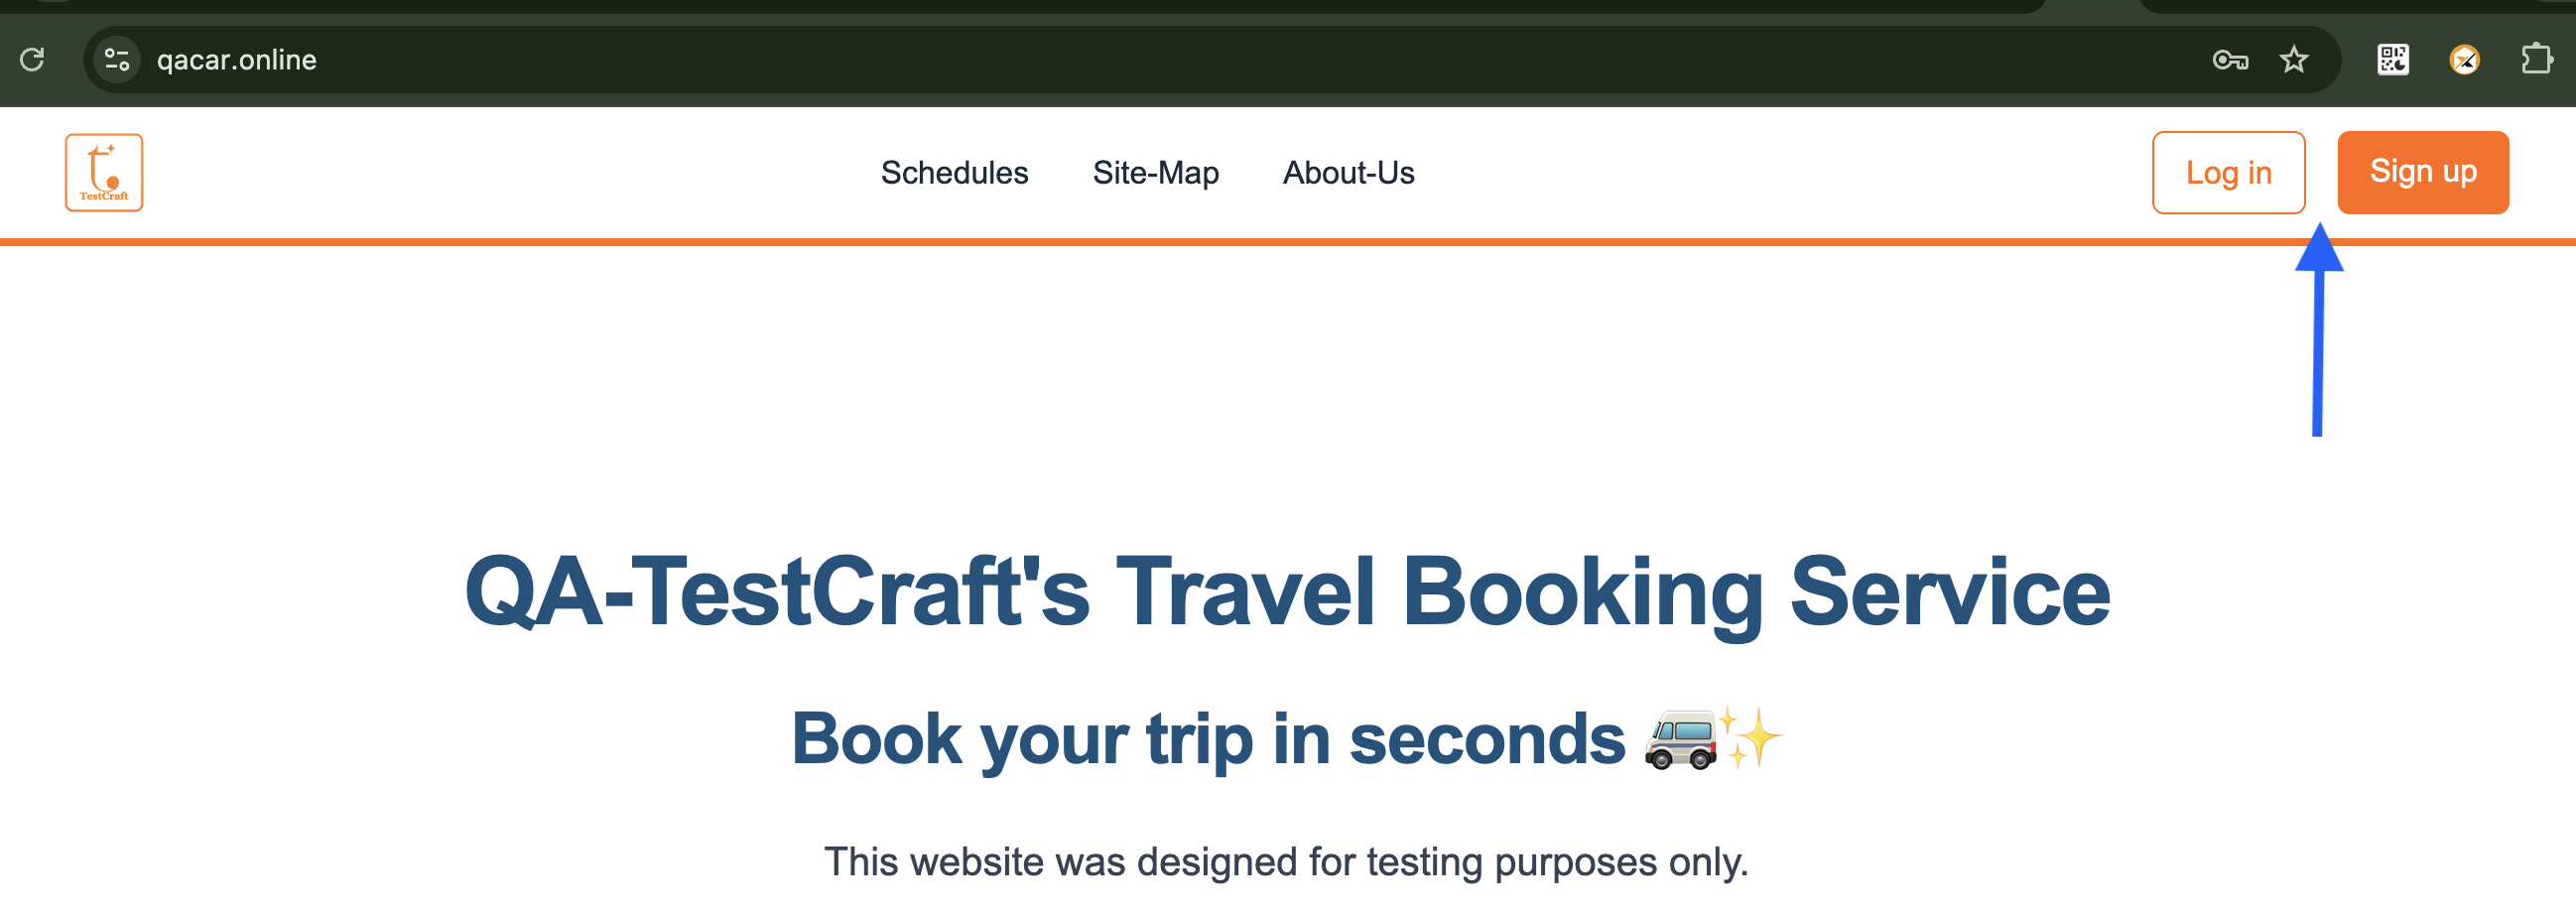
This makes your automation easier to read while also making locators more resilient to many UI changes.
Another example is entering the user's credentials.
When "User fills the login form";
  flow.type "Email" "{{env.EMAIL}}";
  flow.type "Password" "{{env.PASSWORD}}";
Notice that the email address and password are not hardcoded into the script.
Instead, they are loaded from the environment configuration, keeping sensitive information separate from the automation itself.
A Scenario may contain as many When blocks as necessary to describe the user's journey.
And
The And block is reserved exclusively for assertions.
It verifies that the application reached the expected state before the Scenario continues.
For example:
And "User should be logged in";
  flow.expect visible "Logout";
Here, Flowstride confirms that the Logout button is visible.
If the assertion fails, the Scenario immediately fails, making it clear exactly where the expected behaviour was not observed.
Although assertions can also be written inside Given, When or Then blocks, an And block, if used, must contain only assertions.
Attempting to perform actions such as clicking, typing, or navigation inside an And block will result in a validation error.
This convention keeps verification separate from user actions and makes Scenarios easier to read.
Then
The Then block represents the final stage of the Scenario.
Then "User logs out";
  flow.click button "Logout [0]";
Once Flowstride reaches a Then block, the Scenario enters its terminal lock phase.
No additional Given, When, or And blocks may follow.
The only valid construct after Then is the start of a new Scenario.
In this example, notice the element index:
flow.click button "Logout [0]";The number inside the square brackets identifies which matching element Flowstride should interact with.
When multiple elements share the same visible text, indexing allows you to select the exact one you intend.
For example:
Logout
Logout
Logout
The commands below would target different elements:
flow.click button "Logout [0]"; // First matching button

flow.click button "Logout [1]"; // Second matching button

flow.click button "Logout [2]"; // Third matching button
Indexing begins at 0, meaning [0] always refers to the first matching element found on the page.
Although many pages contain only a single matching element and therefore don't require an index, specifying one can make your intention explicit and help avoid ambiguity when multiple matches exist.
This predictable lifecycle, together with Flowstride's natural language locators, makes Scenarios easy to read while still providing precise control over browser interactions.
Why This Reads Like Business Behaviour
Take another look at the Scenario.
Given "User lands on home page";

When "User clicks on Log in, near Sign Up";

When "User fills the login form";

When "User clicks the Login button";

And "User should be logged in";

Then "User logs out";
Even without reading a single Flow command, you can understand exactly what the automation is verifying.
That's intentional.
The descriptive sentences explain the business behaviour.
The Flow commands explain how Flowstride performs the automation.
This separation makes your automation easier to review, easier to maintain, and easier for both technical and non-technical team members to understand.
As your project grows, your .flow files become more than executable tests. They become living documentation of how your application is expected to behave.
Run Your First Flow
Everything is now in place.
You have:
- Installed the Flowstride VS Code extension.
- Configured your
.envfile. - Written your first
.flowautomation.
Now it's time to execute it.
Running from Visual Studio Code
The easiest way to execute a Flowstride automation is directly from Visual Studio Code.
Simply open your .flow file and click the Run button provided by the Flowstride extension.
Once clicked, Flowstride automatically starts the entire execution pipeline for you.
This includes:
- Launching the Flowstride Dashboard.
- Opening the browser.
- Executing the Scenario.
- Streaming execution logs.
- Generating reports and execution artifacts.
Watch the process below.
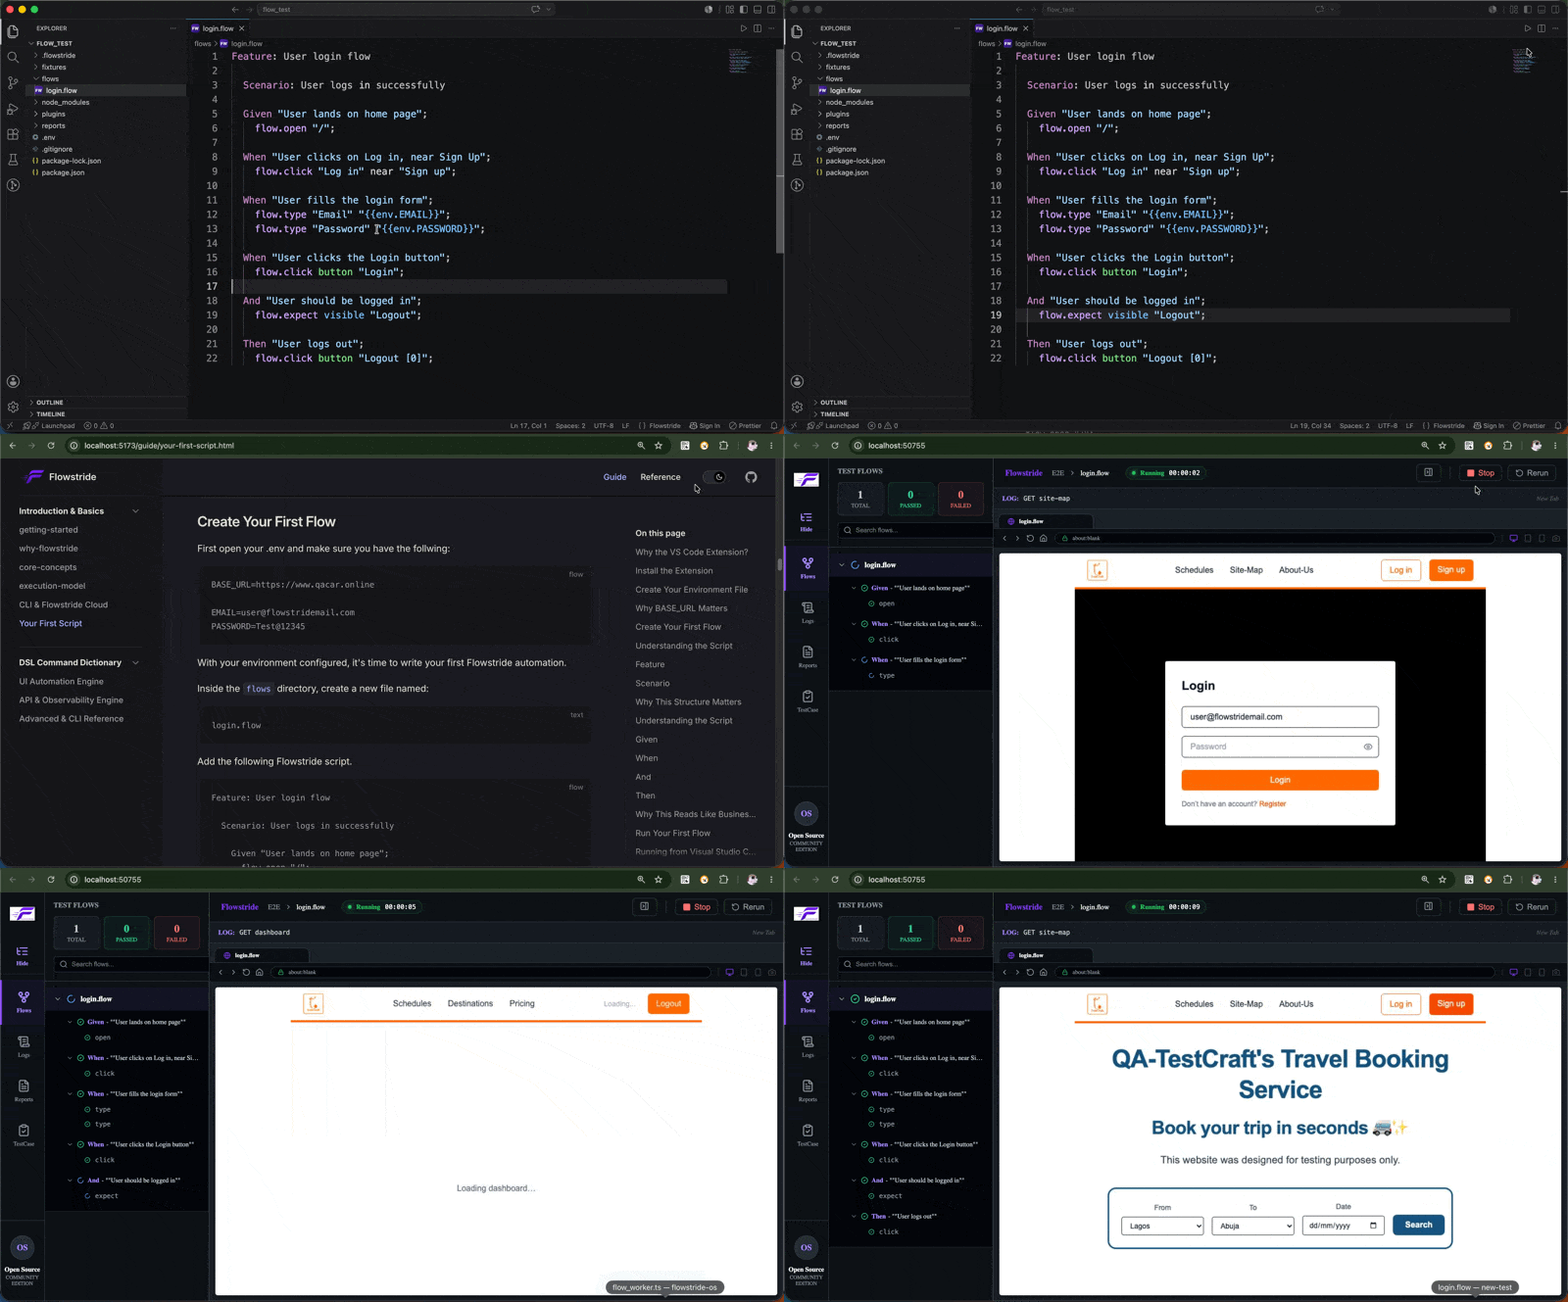
Within a few seconds you'll see Flowstride spring into action.
The browser launches automatically, the Scenario begins executing, and the Flowstride Dashboard starts alongside the automation so you can monitor execution in real time.
For day-to-day development, this is the recommended way to run Flowstride because everything you need is immediately available from within your editor.
Running from the Command Line
If you prefer using the terminal, or you're running automation inside a CI/CD pipeline, the exact same Scenario can be executed from the command line.
npx flowstride runBy default, Flowstride executes every .flow file inside your project's flows/ directory.
You can also execute a specific file.
npx flowstride run flows/login.flowBoth approaches execute the same automation engine.
The only difference is how execution is started.
Whether you click Run inside Visual Studio Code or execute npx flowstride run, Flowstride follows the same execution pipeline.
What Happens During Execution?
When execution begins, Flowstride performs much more than simply opening a browser.
Each stage happens automatically.
Read .flow file
        │
        ▼
Lexical Analysis
        │
        ▼
Parsing
        │
        ▼
Validation
        │
        ▼
Variable Resolution
        │
        ▼
Browser/API Execution
        │
        ▼
Assertions
        │
        ▼
Reports & Dashboard
This pipeline is the same execution model you learned about earlier in the documentation.
Before any browser interaction takes place, Flowstride validates the entire Scenario, ensuring that syntax, structure, and commands are all correct.
Only after successful validation does execution begin.
This approach helps catch problems early and avoids partially executed automation caused by malformed scripts.
During Execution
As the Scenario executes, Flowstride performs several tasks simultaneously.
While the browser is interacting with your application, Flowstride is also:
- Executing each step in the Scenario.
- Updating the execution tree in real time.
- Streaming live logs to the Dashboard.
- Recording execution artifacts.
- Tracking the overall progress of the run.
The animation below shows all of these happening together.
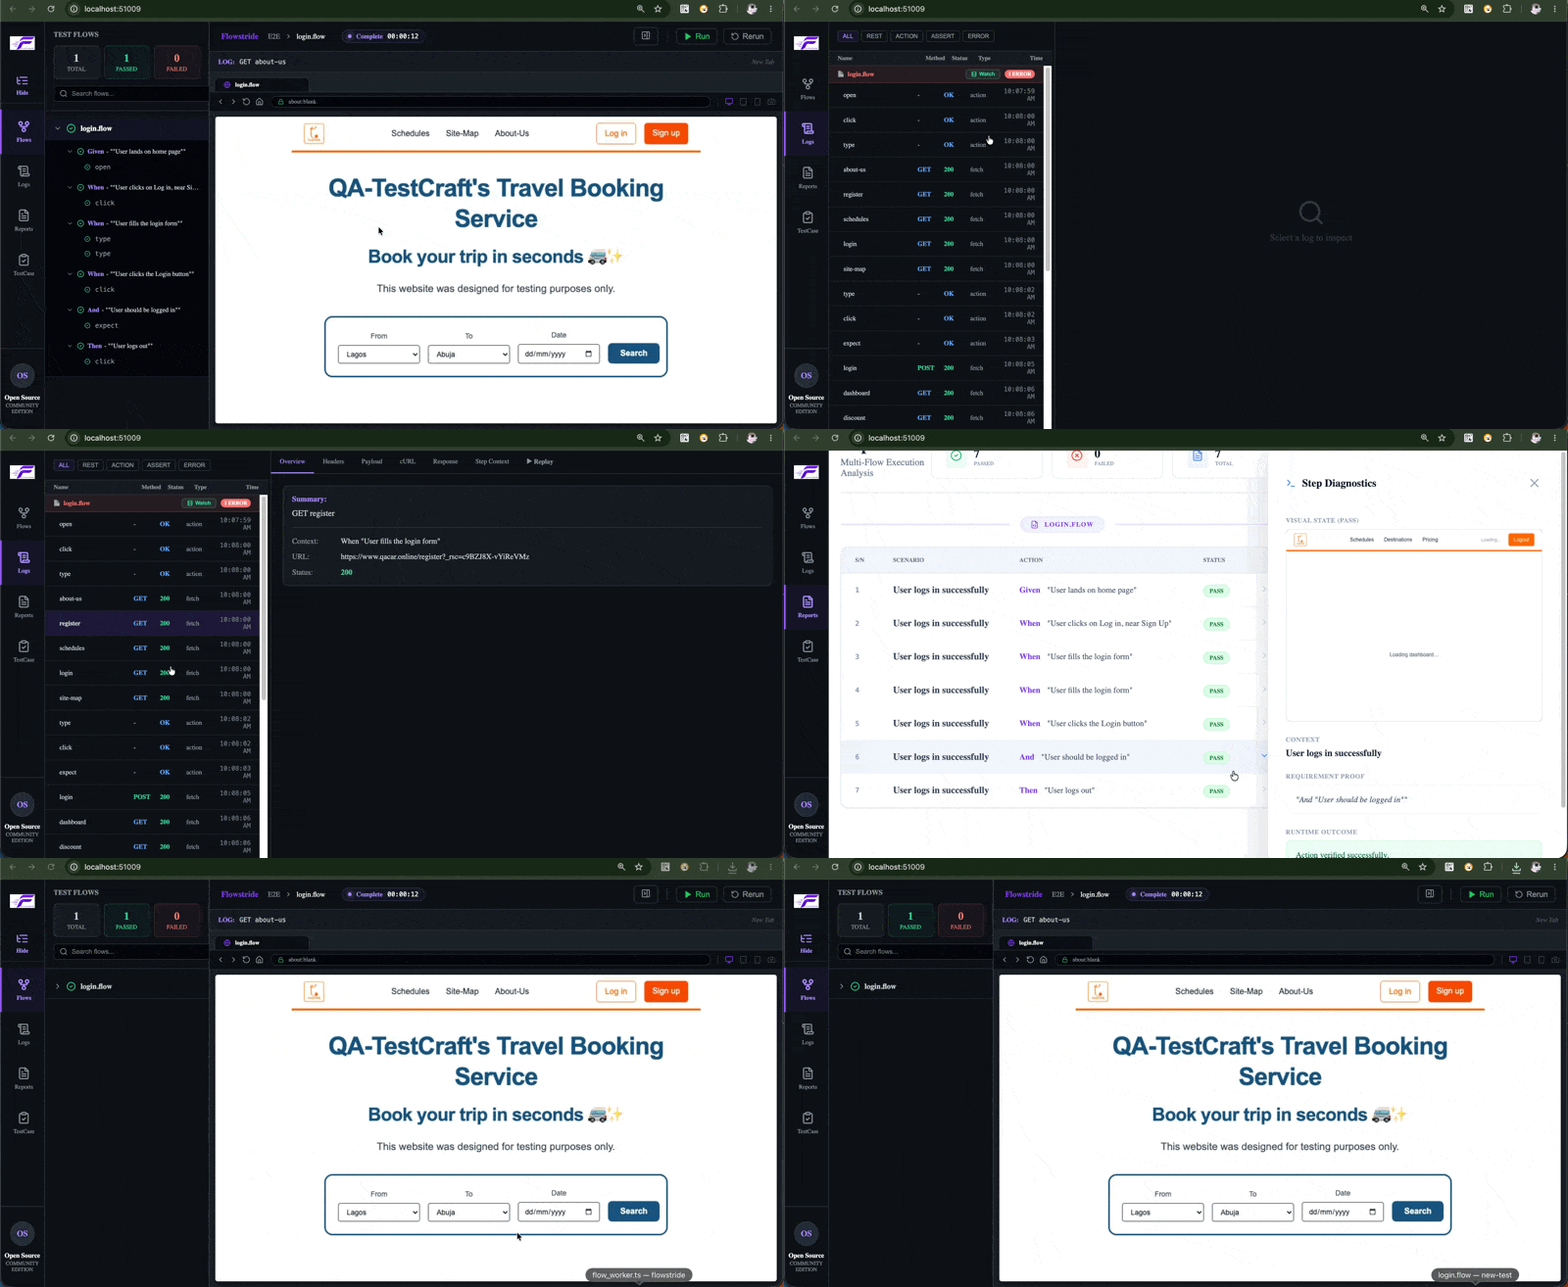
Rather than waiting until execution finishes, you can watch every step as it happens.
This makes it significantly easier to understand failures, identify where execution stopped, and verify that your automation is behaving exactly as expected.
Following Execution from the Terminal
While the Flowstride Dashboard provides a rich visual experience, every execution is also streamed to the terminal.
This makes it easy to monitor progress when working from the command line, over SSH, or inside a CI/CD pipeline.
As each step completes, Flowstride prints the Scenario exactly as it executes it.
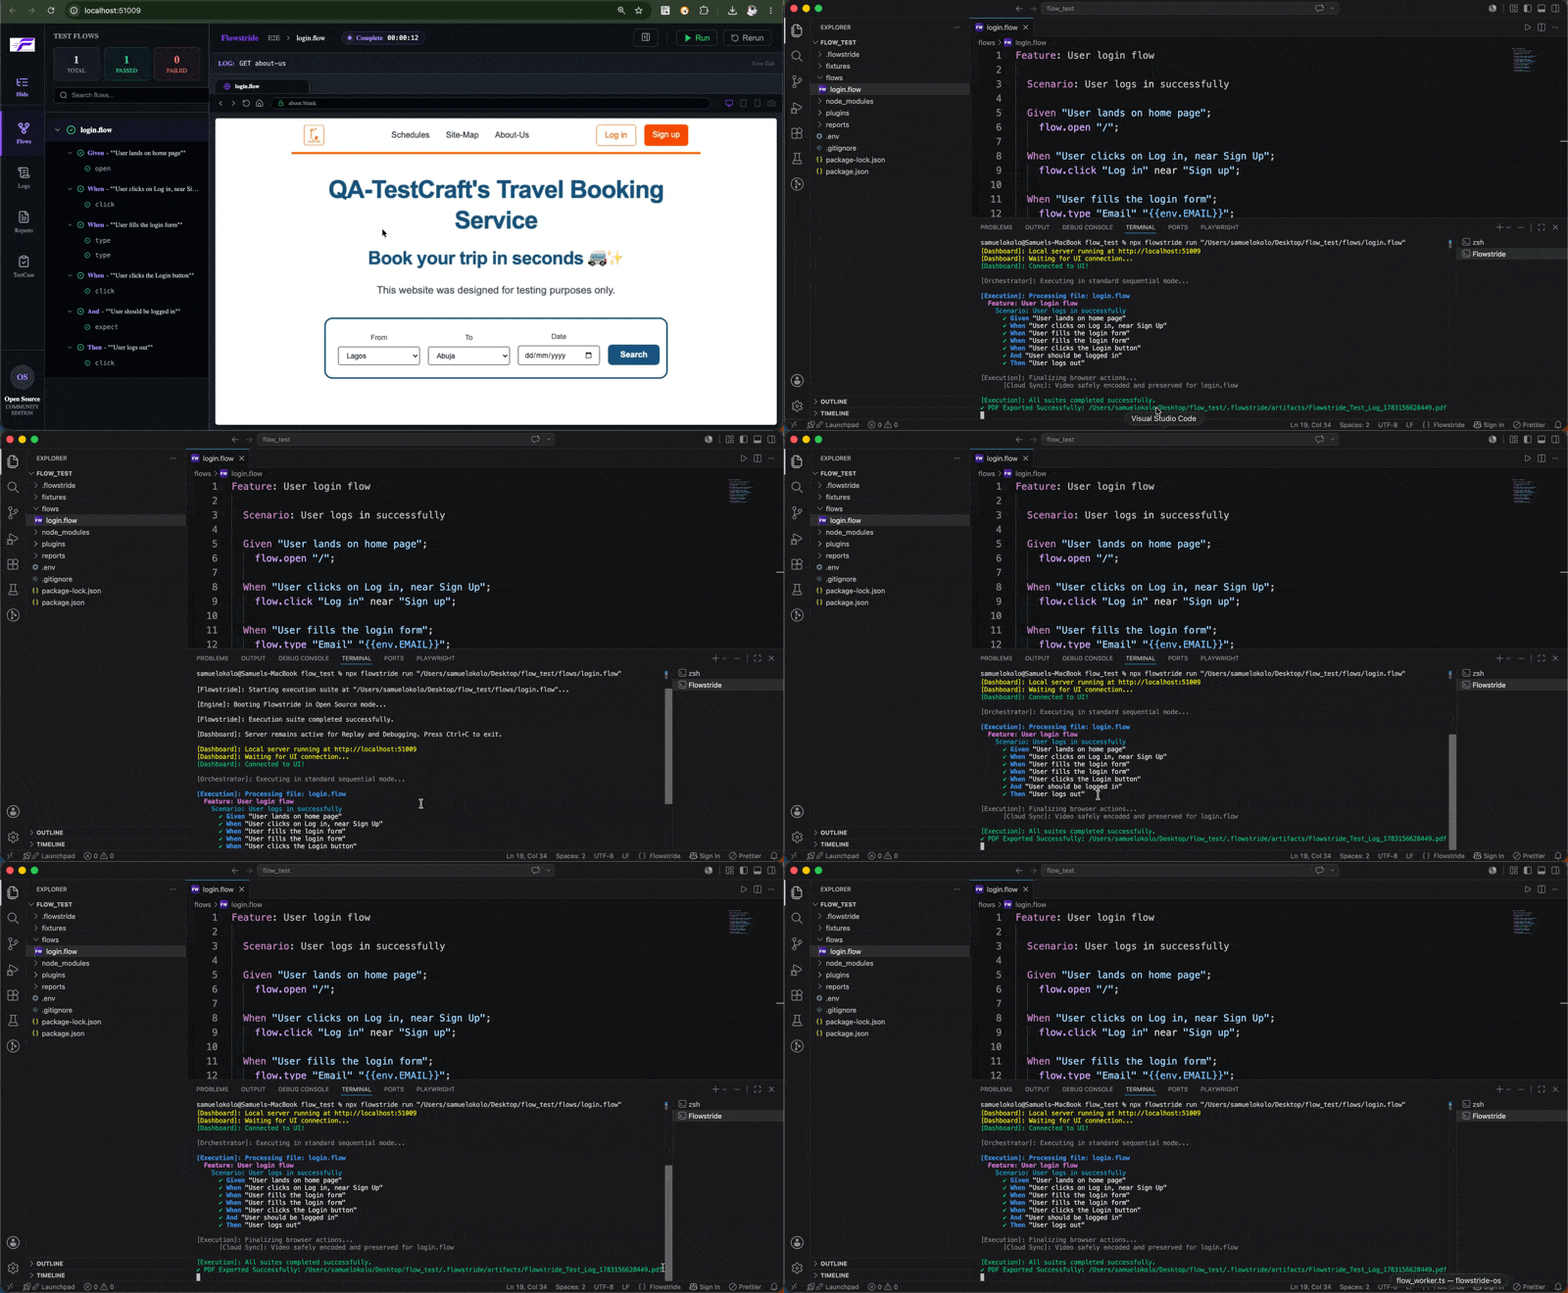
The output closely mirrors the structure of your .flow file.
For example:
Feature: User login flow

Scenario: User logs in successfully

✔ Given User lands on home page

✔ When User clicks on Log in, near Sign Up

✔ When User fills the login form

✔ When User clicks the Login button

✔ And User should be logged in

✔ Then User logs out
Because every step includes its business description, you don't have to decode low-level browser actions to understand what happened.
Whether you're watching the Dashboard or reading terminal output, Flowstride presents the same Scenario in a clear, human-readable format.
This consistency makes it easy to follow execution locally, on remote machines, or inside automated build pipelines.
When Execution Completes
If every step succeeds, Flowstride marks the Scenario as passed.
If any action or assertion fails, execution stops and Flowstride immediately reports where the failure occurred.
Because each step includes a human-readable description, failures are easy to identify.
For example, instead of seeing only a failed browser action, you'll know exactly which business behaviour failed.
✔ Given User lands on home page

✔ When User clicks on Log in

✖ And User should be logged in
This makes debugging considerably easier than working with low-level browser logs alone.
One Engine, Multiple Ways to Run
Whether you execute Flowstride from:
- The VS Code Run button
npx flowstride run- A CI/CD pipeline
the same execution engine is used every time.
This guarantees consistent behaviour across local development, team environments, and automated deployment pipelines.